
Elementor reigns as the go-to page builder for WordPress, and now it’s integrated with the Prodigy Commerce WordPress Plugin! Not only can the WordPress community of developers, designers, and agencies build fast, free, and secure online stores for their clients with Prodigy, but they can also design with ease using Elementor.
With a myriad of powerful Elementor widgets, and Elementor page templates (with conditions for displaying them in specific places), Prodigy’s Elementor integration serves as the easiest way to construct online stores—especially since it has more features and widgets than what’s offered in the WooCommerce Elementor plugin.
Here’s a breakdown of what comes with Prodigy’s Elementor integration:
- Products widget for featuring a collection of items in grid of slider form
- Categories widget to add a category list in grid or slider form
- Category widget for showing content from one category, anywhere on your store
- Cart widget to add a drop-down or slide-out cart icon anywhere on the website, or inside the global header
- My Account widget to insert a quick link to the Prodigy Commerce customer portal, allowing customers easy access to their account information
- Cart Page widget with the functionality to customize every aspect of your store’s shopping cart
- Thank You Page widget for designing a Thank You page that buyers get redirected to
- Related Products widget to upsell or cross-sell relevant items while customers are on the Thank You or Cart pages
- Product Archive template for designing and conditionally displaying product archive pages through Elementor
- Single Product template for creating several product pages and conditionally adding them to certain items
- Powerful content and design customization tools for every Prodigy Elementor widget and template
Prodigy with Elementor vs WooCommerce with Elementor
| Prodigy w/ Elementor | WooCommerce w/ Elementor | |
|---|---|---|
| Products widget | ✅ | ✅ |
| Categories widget | ✅ | ✅ |
| Category widget | ✅ | ❌ |
| My Account widget | ✅ | ✅ |
| Product Cart widget | ✅ | ✅ |
| Cart page widget | ✅ | ✅ |
| Thank You page widget | ✅ | ❌ |
| Related Products widget | ✅ | ✅ |
| Product Archive template | ✅ | ✅ |
| Single Product template | ✅ | ✅ |
| Conditional Displays for templates | ✅ | ✅ |
View the full comparison of Prodigy vs WooCommerce.
Features That Come with the Prodigy Commerce Elementor Integration
Elementor integrates seamlessly with Prodigy, allowing for an instant setup and fluid process when adding products and designing a store. You can customize any of your theme’s pages with Elementor, while still having the luxury of adding products through the Prodigy Commerce platform.
For its main features, the Prodigy Elementor integration boasts several widgets with easier controls and more powerful customization settings than what’s offered in WooCommerce. In addition, all page templates include conditional display options.
Here’s a more in-depth look at the features from Prodigy’s Elementor integration:
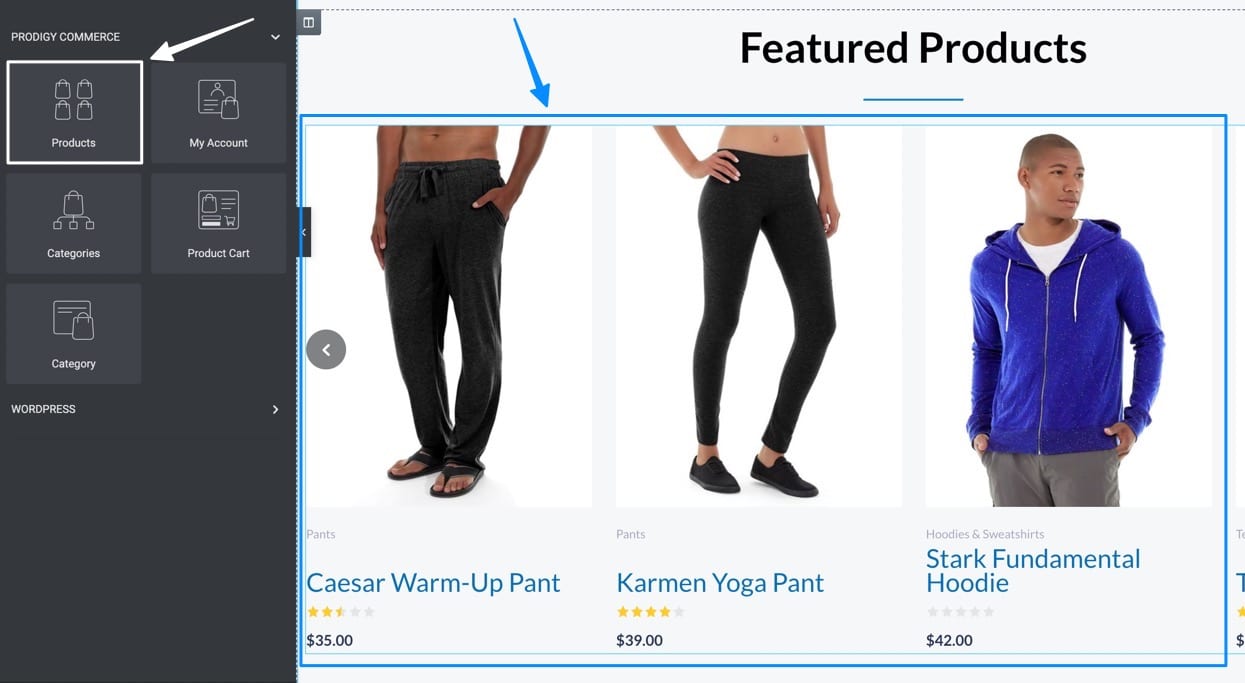
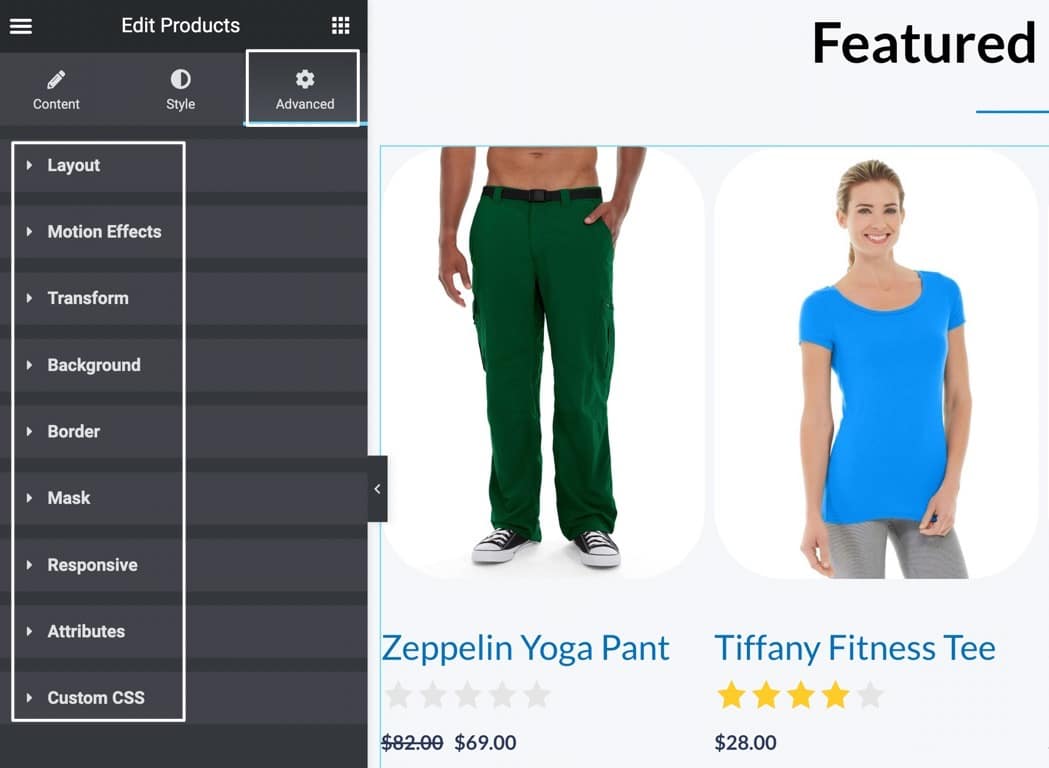
Products Widget
The first widget that comes with the Prodigy integration is called the Products widget, which is ideal for featuring sliders or grids with multiple products, like for “Featured Products” or New Arrivals” sections.
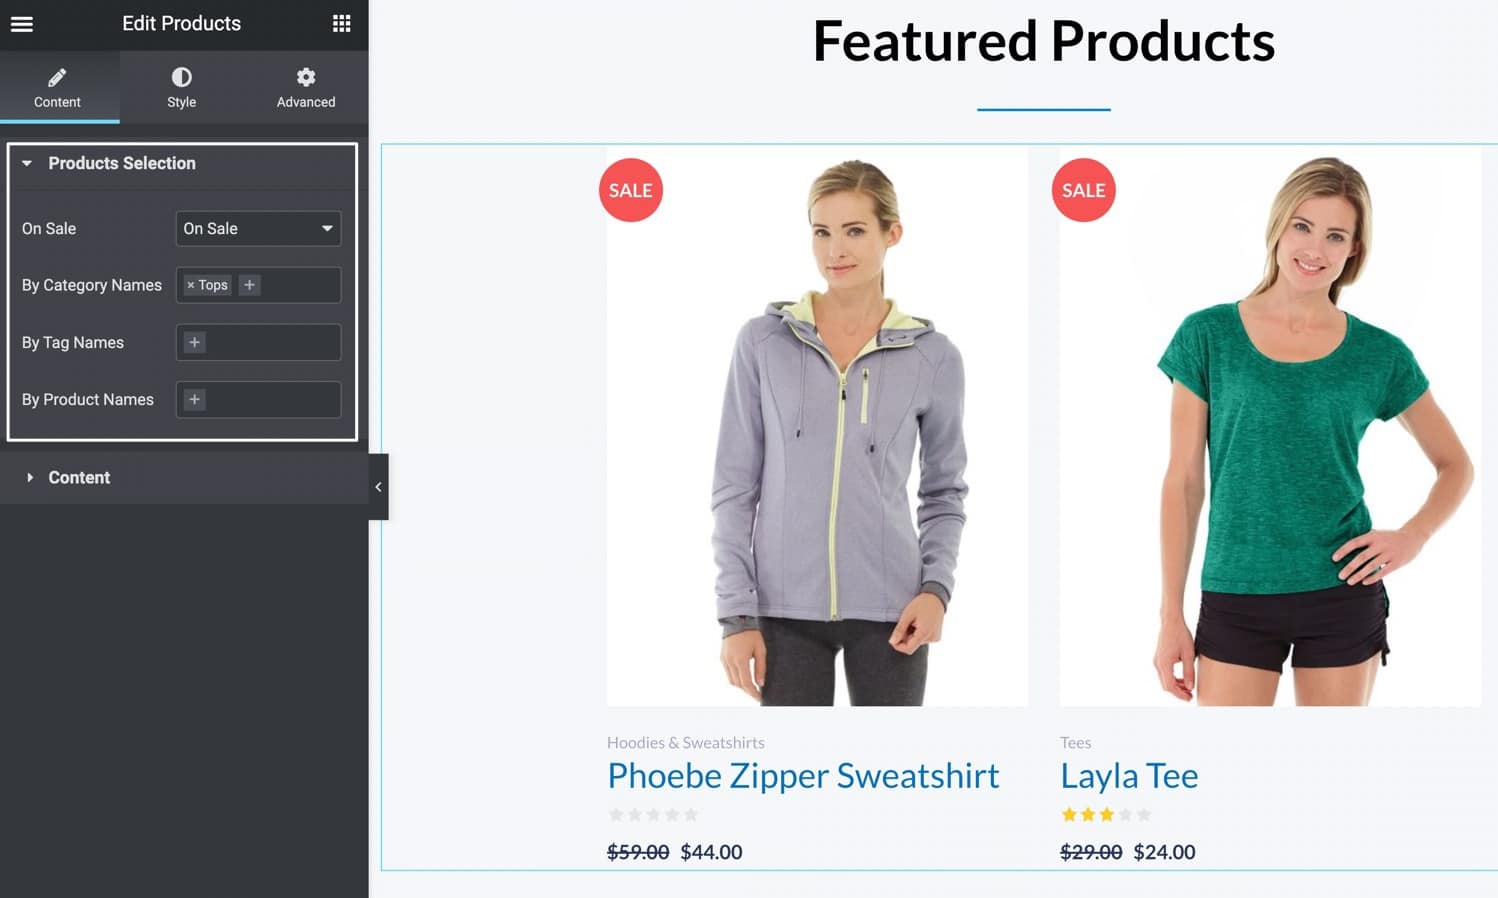
As with all Prodigy Elementor widgets, the Products widget includes settings tabs for Content, Style, and Advanced options. Use quick settings to sort by:
- Product names
- Tag names
- Category names
You can even add a label for all “On Sale” items.
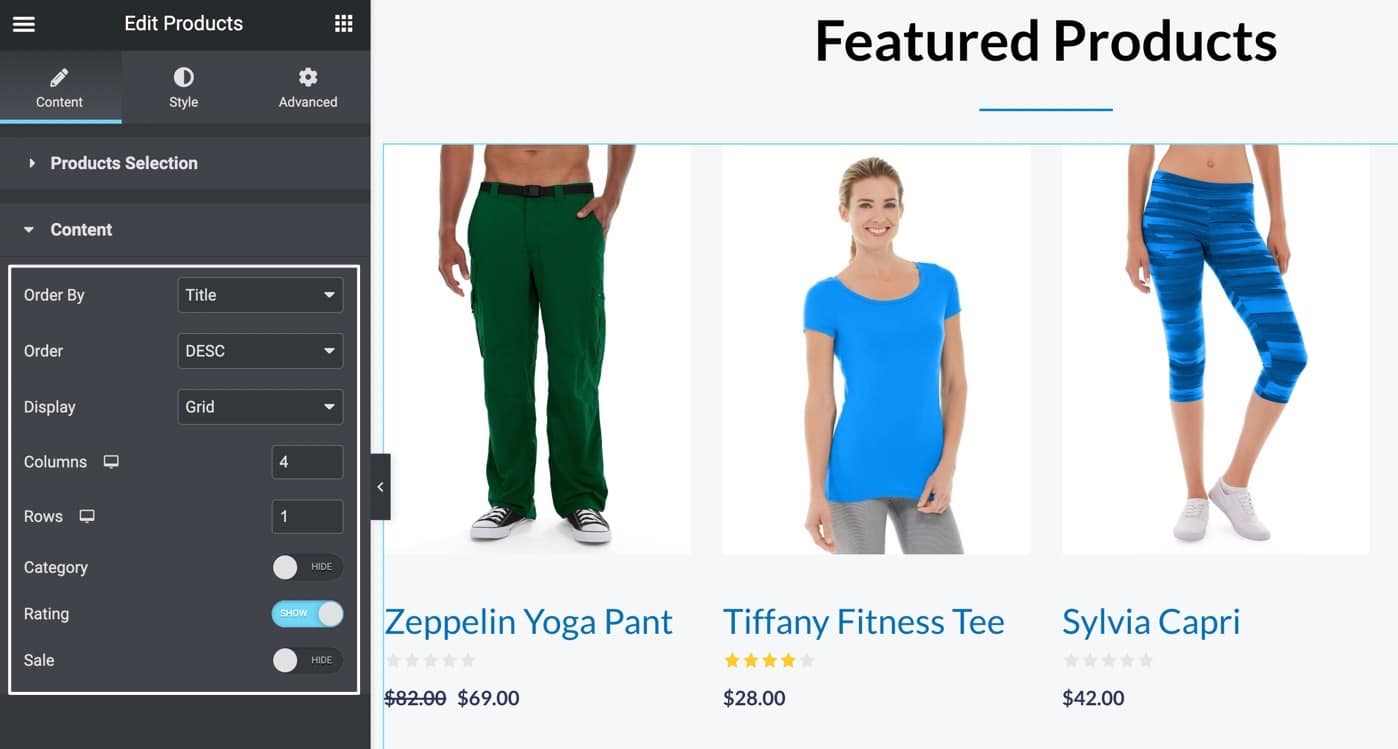
In the Content section, quite a few settings help you adjust the display of your content, including:
- Displaying a grid or slider
- Adding or removing rows and columns
- Showing categories
- Displaying ratings
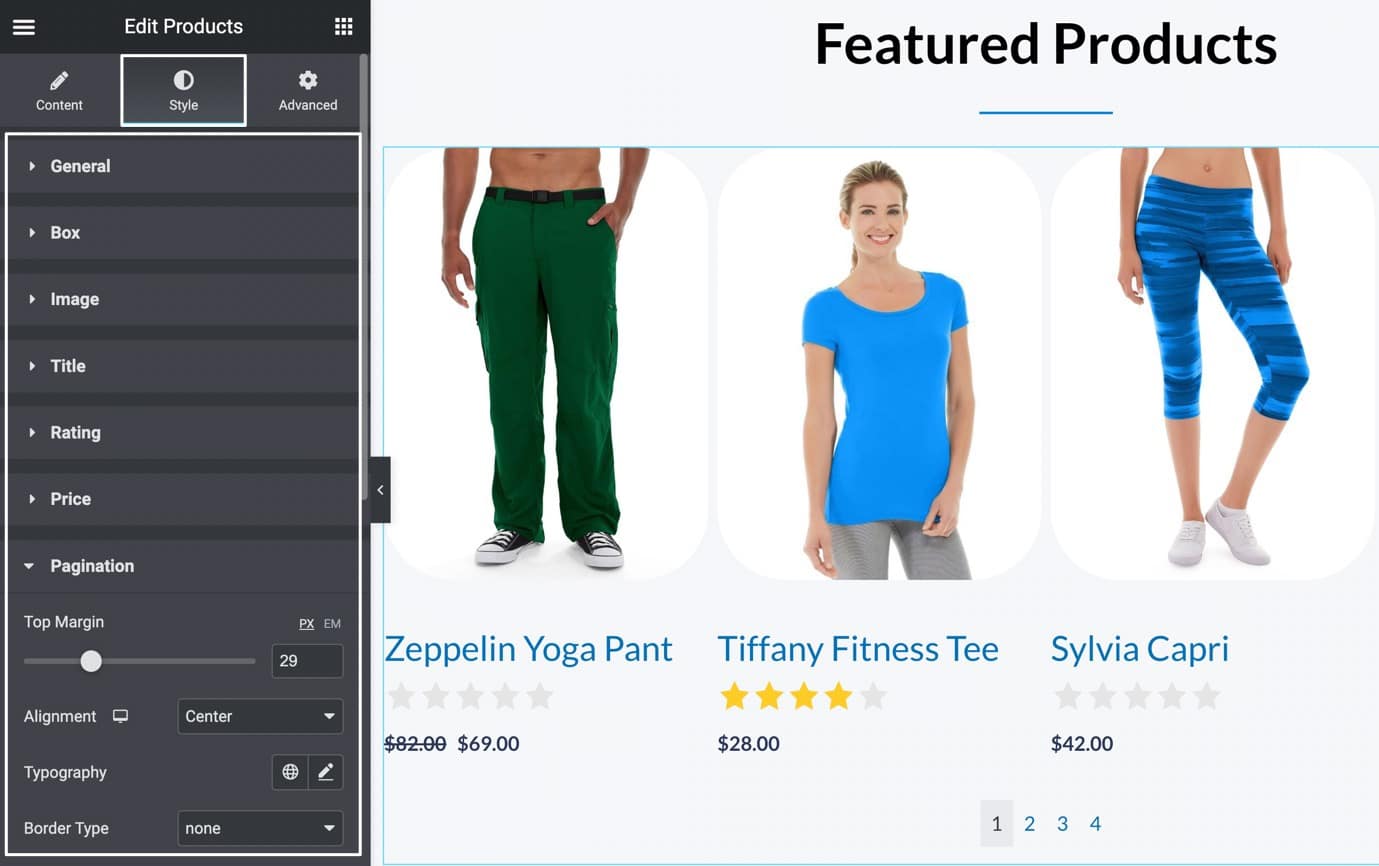
The Style tab of the Products widget assists in designing the widget however you see fit. From margin controls to image adjustments, there’s a long list of styling settings that are unmatched when compared to WooCommerce’s Elementor plugin.
You can style:
- Boxes
- Images
- Titles
- Ratings
- Pricing
- Pagination
And much more!
Finally, the Products widget has Advanced settings to address more specific styling and content issues, ranging from custom CSS to background colors.
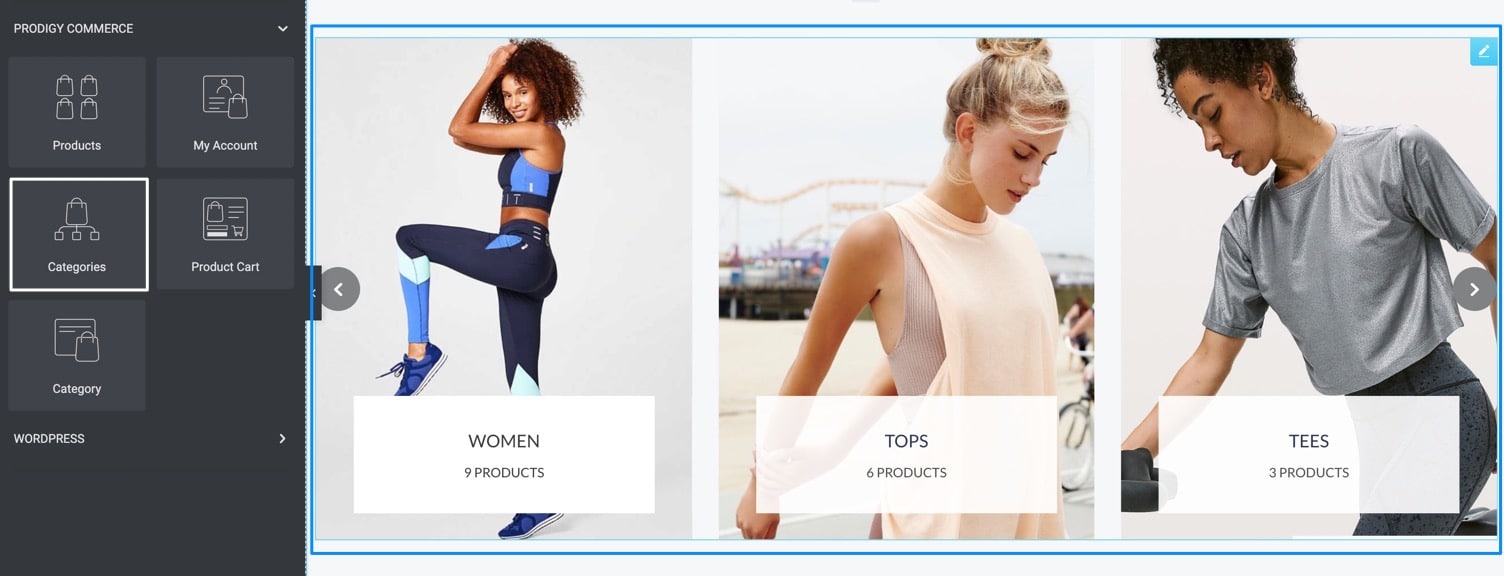
Categories Widget
Prodigy offers a Categories widget with its Elementor integration, which instantly inserts a grid or slider with several product categories. It’s a homepage essential, and a beautiful way to add imagery and interactivity to your client’s websites.
For customizing the Categories widget, you can use the Content tab for showing different categories based on parent names and category names.
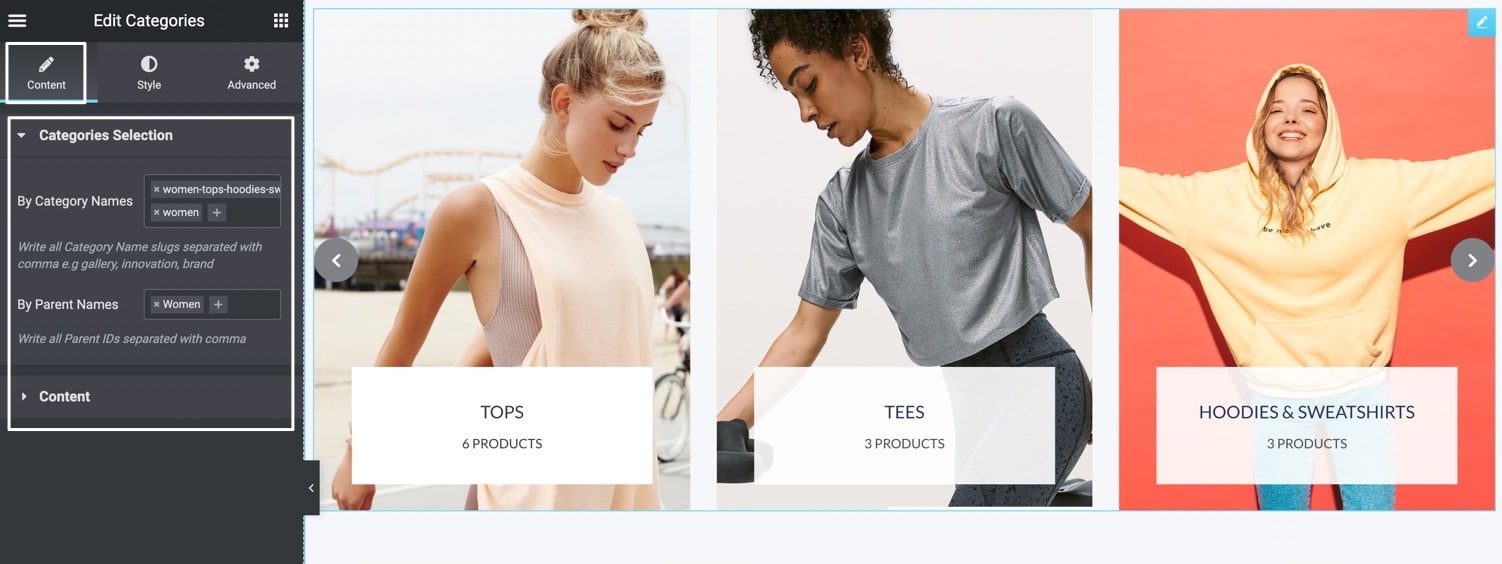
The Style tab has settings for General styling, along with a myriad of options for Sliders, Overlays, and Titles.
As an example, the Box tab offers Border Radius and Box Shadow features to make the categories quickly look like they’re rounded and floating over the background.

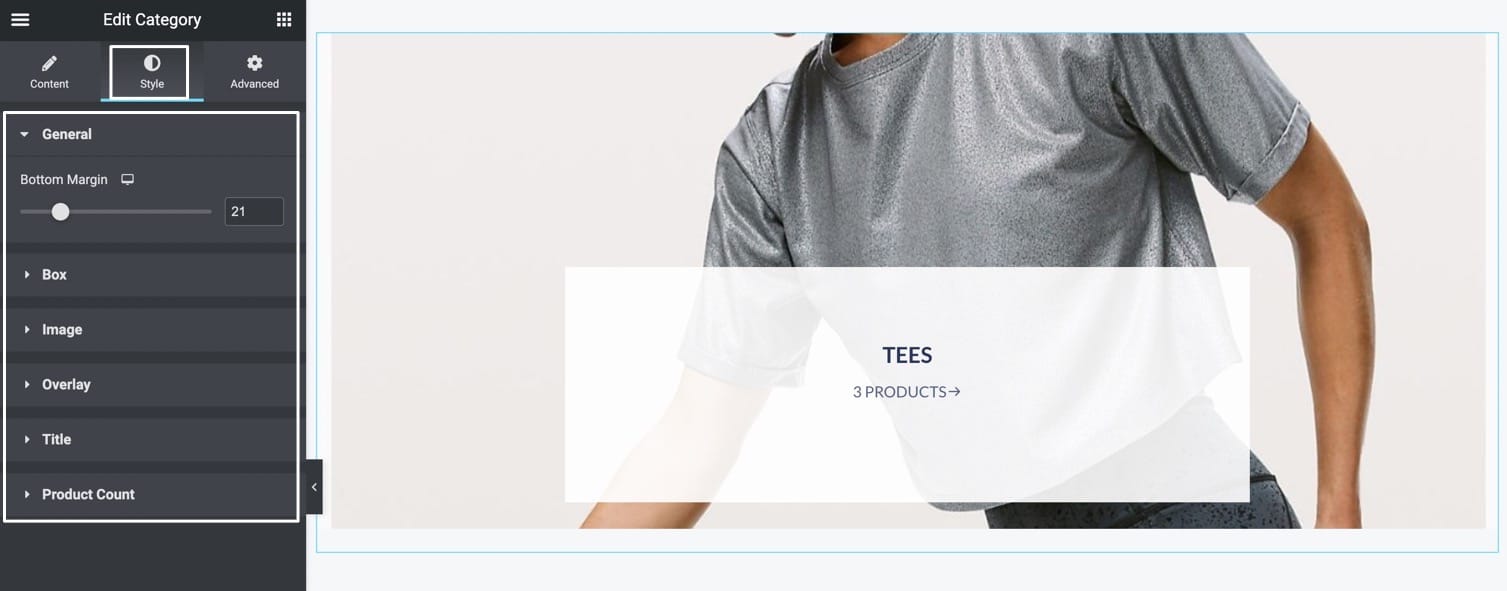
Category Widget
The Category widget is different from the Categories widget, in that it only showcases one category. It’s great for placing a category banner on your homepage, or other pages, allowing for a full width visual.
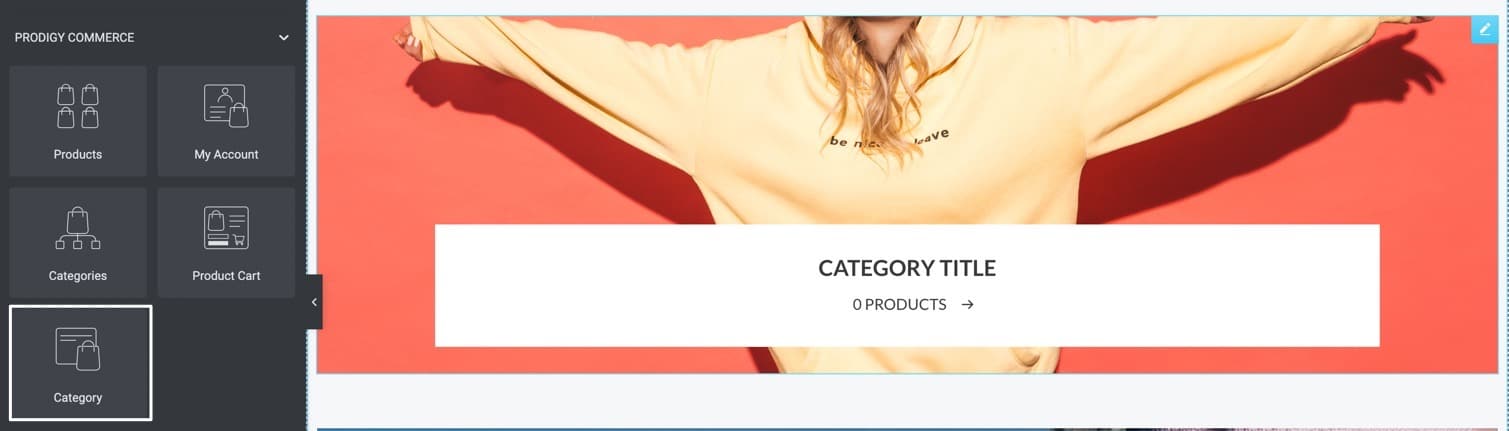
Customizations allow for picking the categories based on the category name, along with various content customization options.
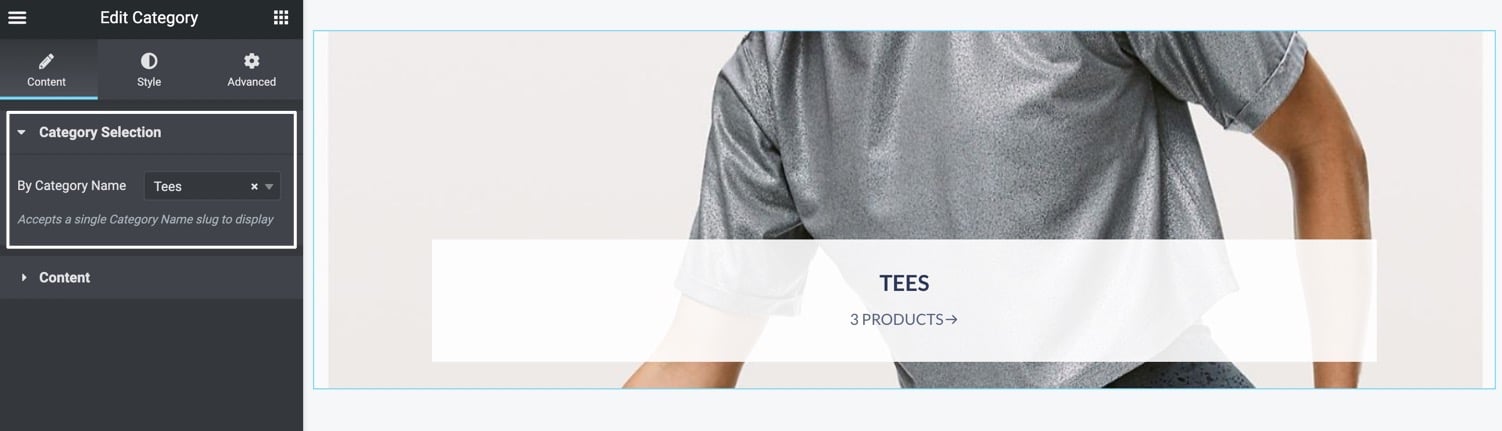
You can also adjust Style settings, like for changing the Bottom Margin, or to edit:
- Boxes
- Images
- Overlays
- Titles
- Product Counts
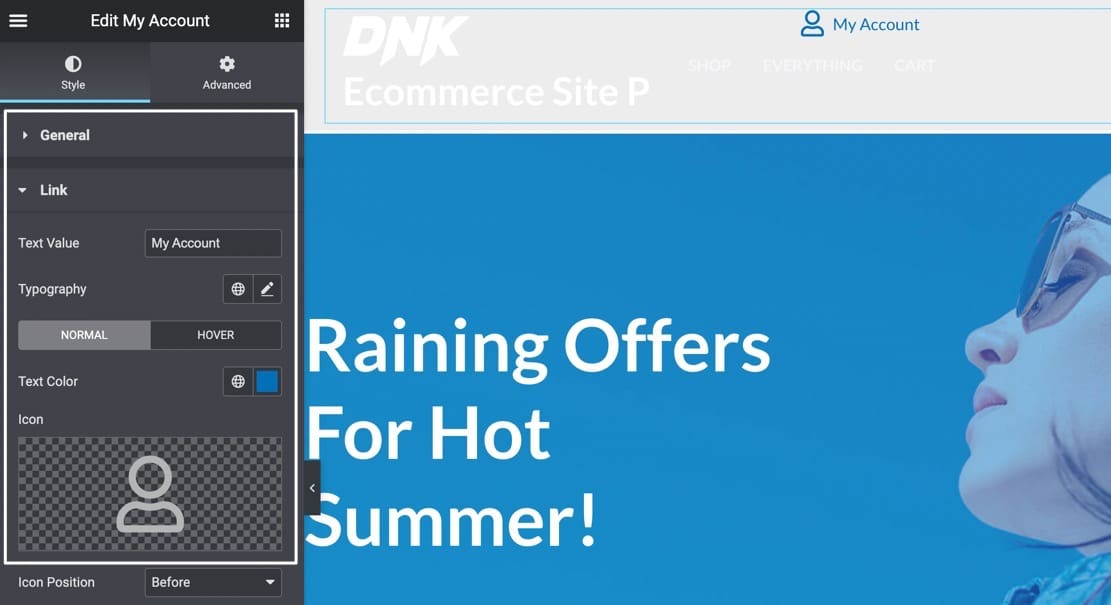
My Account Widget
Best inserted into a global header, the My Account widget adds a link for customers to navigate to the Prodigy Commerce customer account portal.
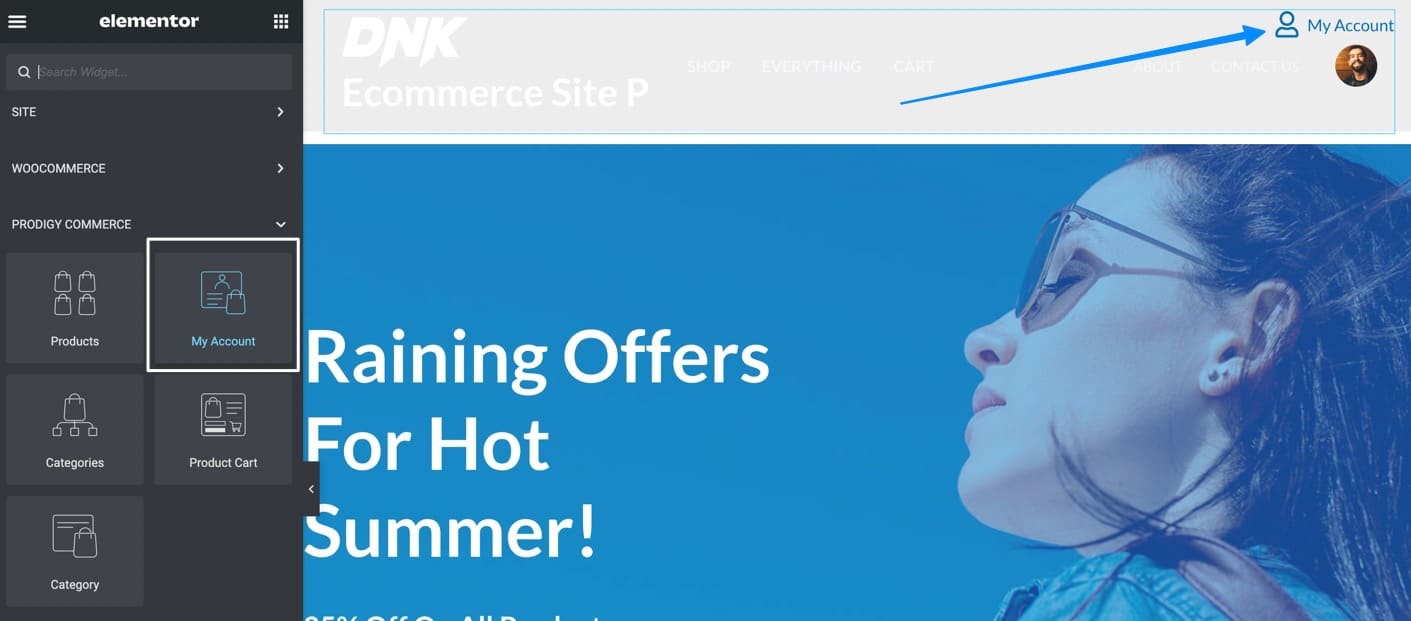
Customization options include location settings, colors, and a tool to add an icon next to the link.
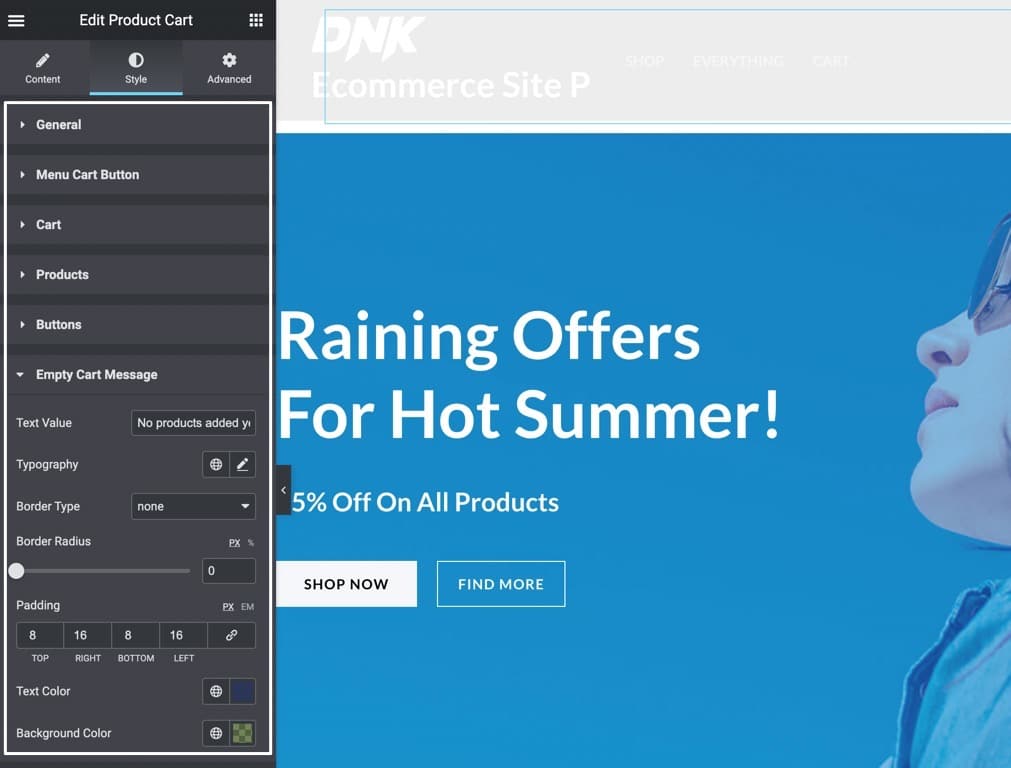
Product Cart Widget
Much like the My Account widget, the Product Cart widget belongs in a global header for customers to access their cart contents at all times. Developers can add the Product Cart widget with a quick drag and drop, then customize elements like icon, locations, and styling.
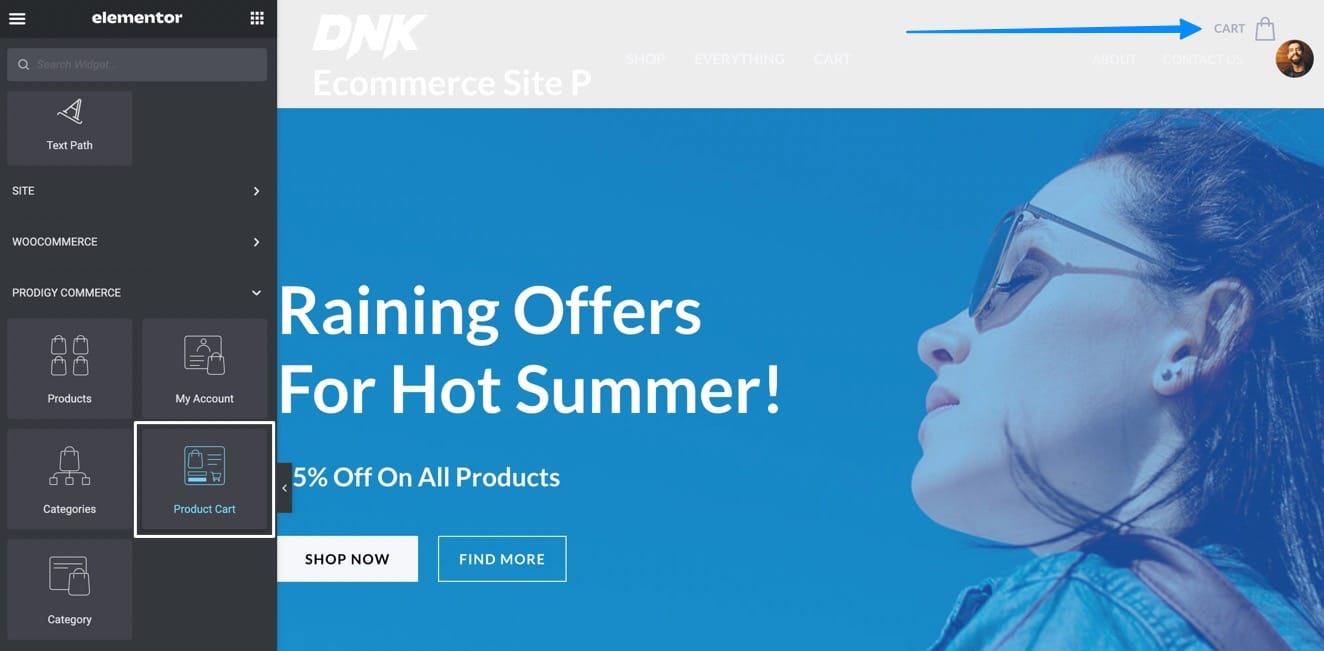
Some unique Content settings include options to swap out the default icon, change the cart type to a Slide or Dropdown, and to automatically open the cart whenever an item is added.
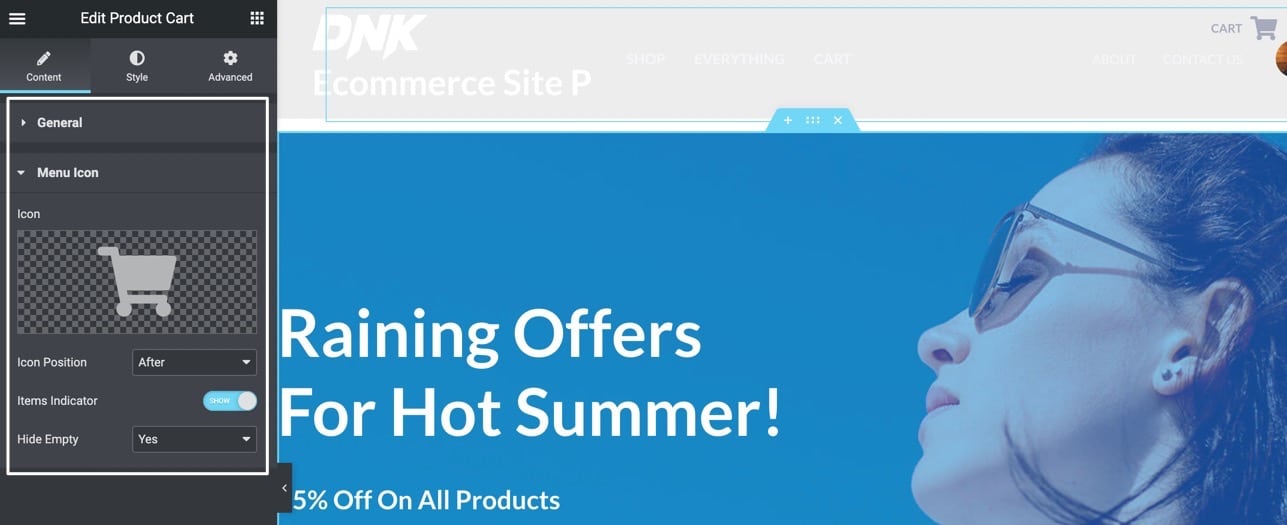
There are also some cart-specific styling options for:
- Menu Cart Buttons
- Products
- Empty Cart Messages
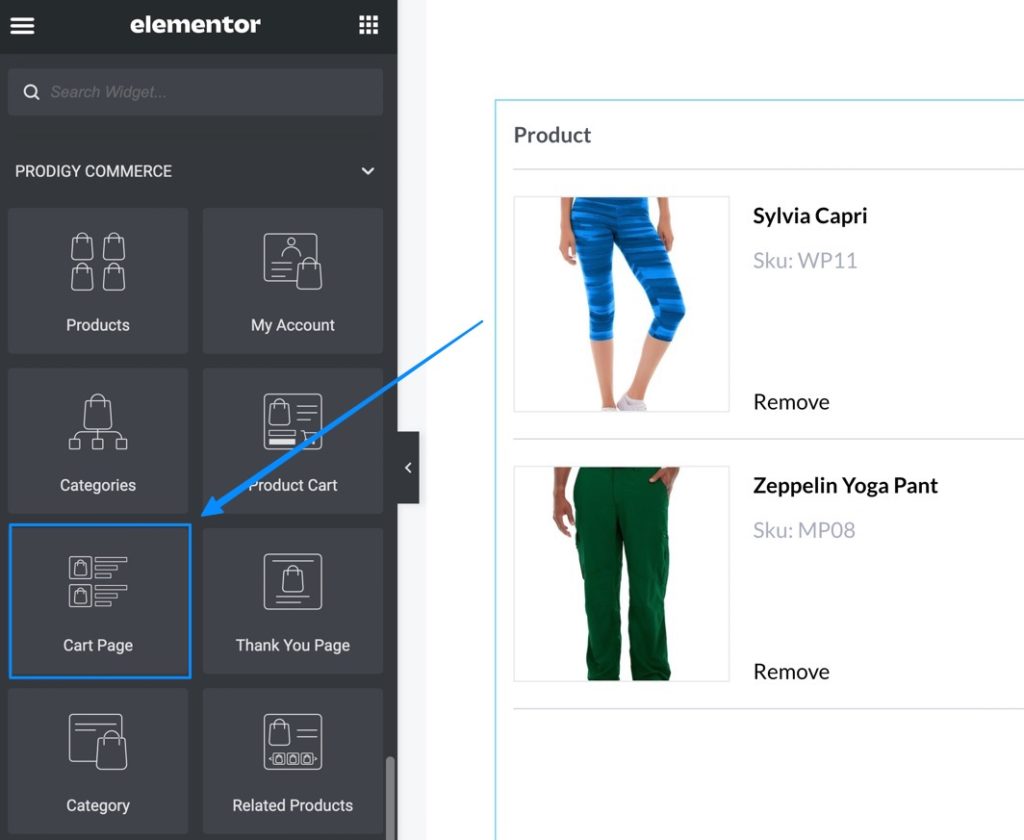
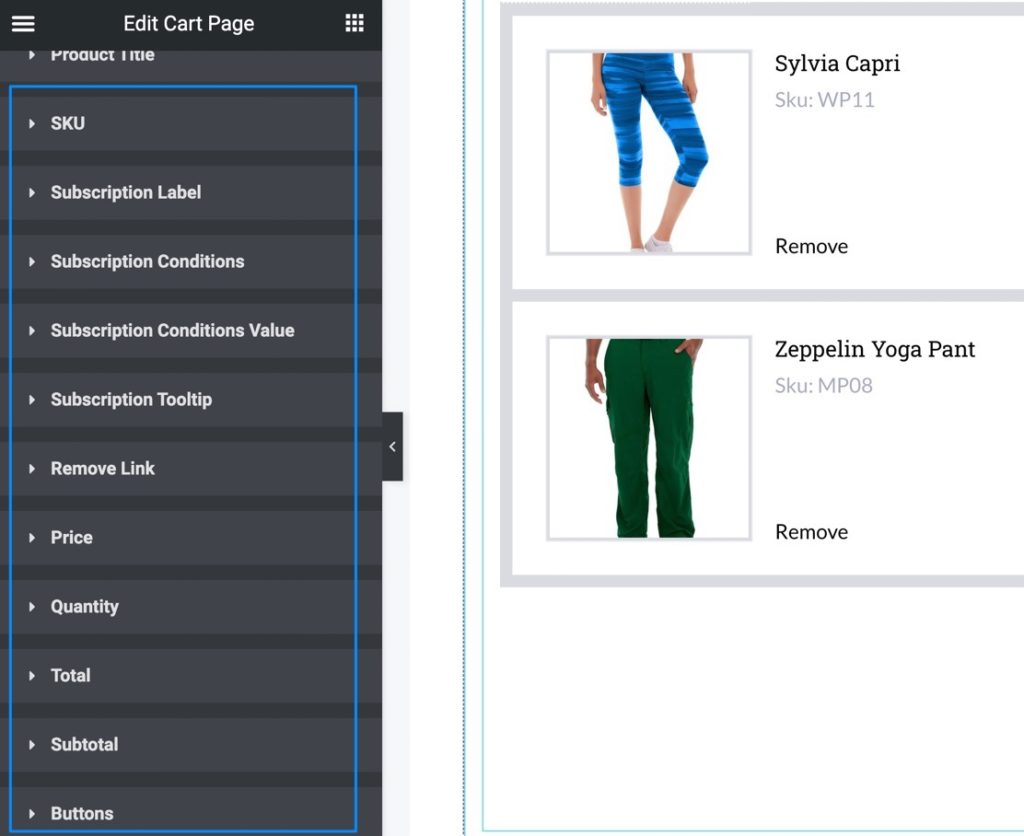
Cart Page Widget
The Cart Page widget is an essential for Prodigy and Elementor users who want complete control over the design of the shopping cart pages. You can customize every aspect of the cart page that customers see, and create new cart pages from scratch.
You can find the Cart Page widget as one of the drag-and-drop Elementor modules, and use it to replace the default shopping cart that’s generated by a shortcode.
The customizations are endless, with options to adjust settings for:
- Product Tables
- Product Rows
- Product Images
- Product Titles
- SKUs
- Subscription Labels
- Buttons
- Prices
- And much more
And every edit you make to the shopping cart gets shown in the Elementor preview window before publishing.
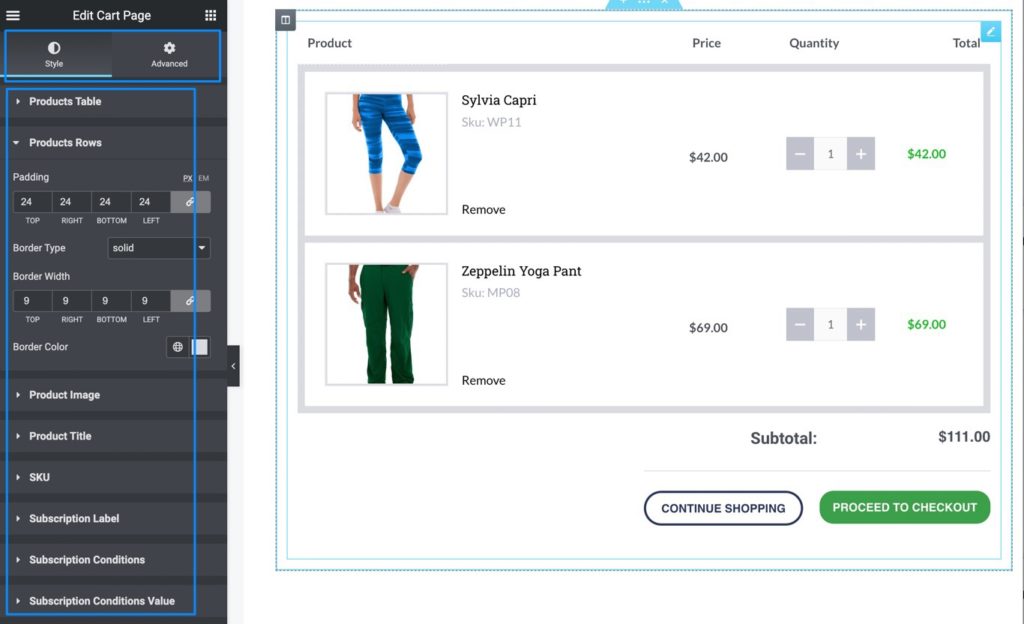
You’ll notice that the customizations for the Cart Page widget get extremely specific, like how you can set icon hover colors and tooltip text for any subscription products added by customers to the cart.
Thank You Page Widget
By default, Prodigy Commerce redirects all buyers to an order confirmation Thank You page; upon installing Prodigy, that page is automatically generated and filled with content via a shortcode. However, it’s understandable that merchants may want even more control over their Thank You page, especially considering the potential for upsells and cross-sells at this point of the sales process.
That’s why Prodigy provides a Thank You Page widget through the Elementor page builder.
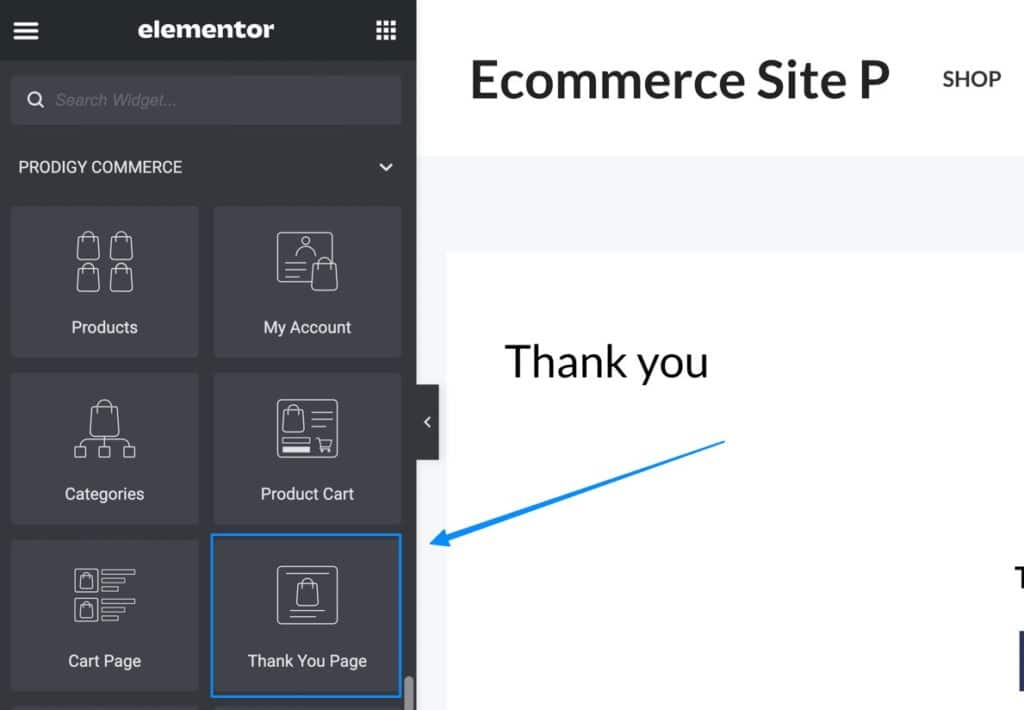
The standard Thank You page has a “thank you” and “successfully placed” order message, along with the order number and a button back to the shop. But exchanging the default Thank You page shortcode for the widget provides numerous other features.

The Thank You page widget is mainly controlled through the Style panel, where you’re given customization options for the heading, content, and buttons.
You can adjust the size of the heading, while also giving a facelift to the content text, color, and typography. Finally, the Thank You page widget from Prodigy offers a Button tab for adding brand colors to the button and making the overall style match your website.

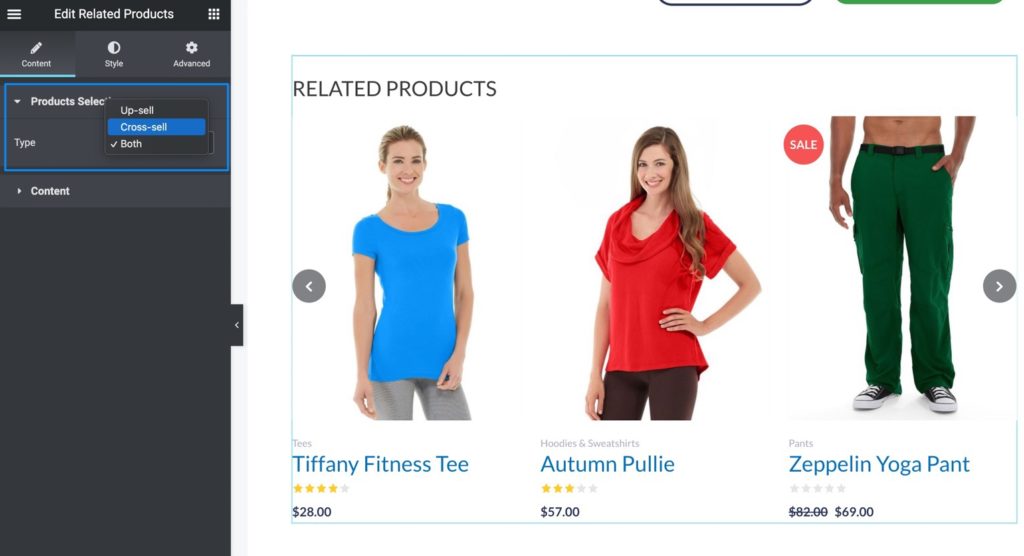
Related Products Widget
The Related Products widget is primarily meant to be placed inside Cart and Thank You pages, considering Prodigy already has a feature for showing related products on regular product pages. This widget boosts potential for more sales, seeing as how you’re able to upsell and cross-sell at times where customers have already shown interest in buying.
The Related Products widget, as with all Prodigy widgets, is a simple Elementor module that you can drag onto the Cart or Thank You page.
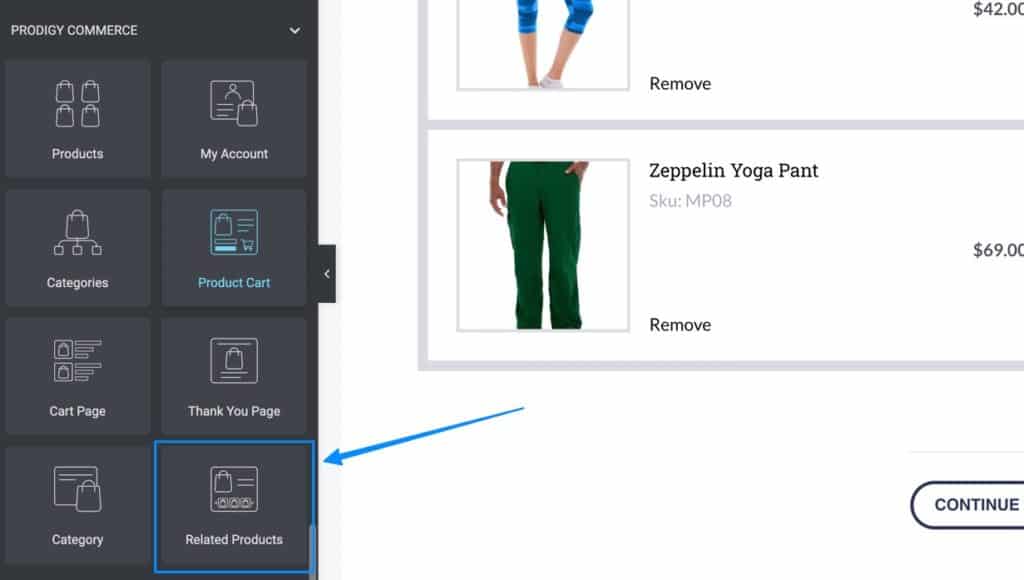
Once active, the widget offers content settings for choosing the type of related products you’d like to showcase. Pick upsells or cross-sells, or consider showing both! Related product examples get generated in the Elementor preview to give you an idea of what types of items might appear for customers.
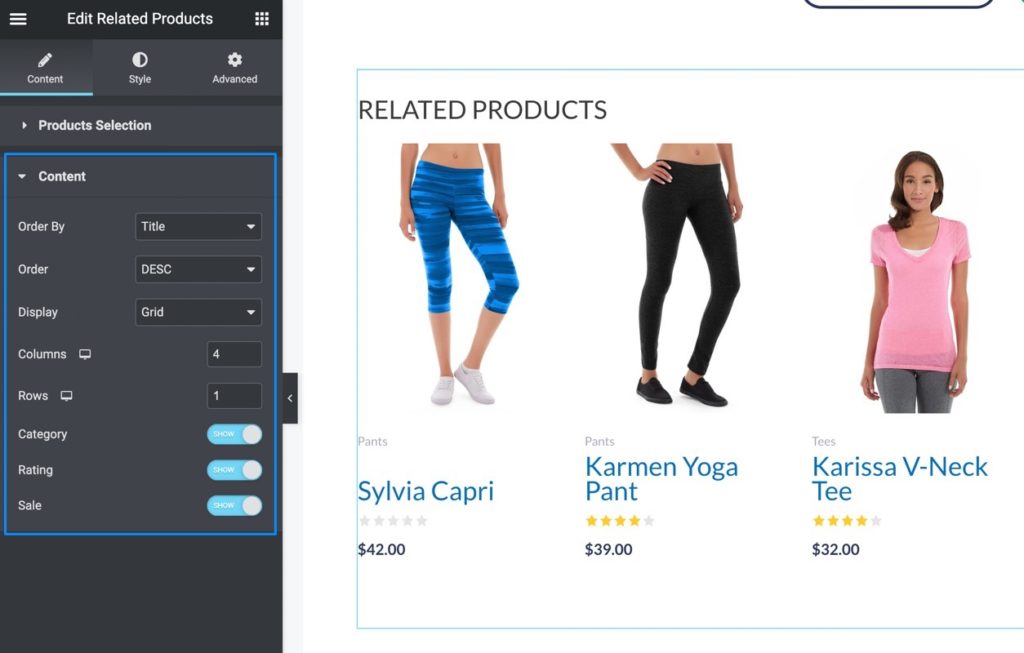
The Content tab in the Related Products widget taps into how the product gallery looks, with options to display a grid format and change the number of rows and columns. You can even show or hide elements like category tags, ratings, and sale markers.
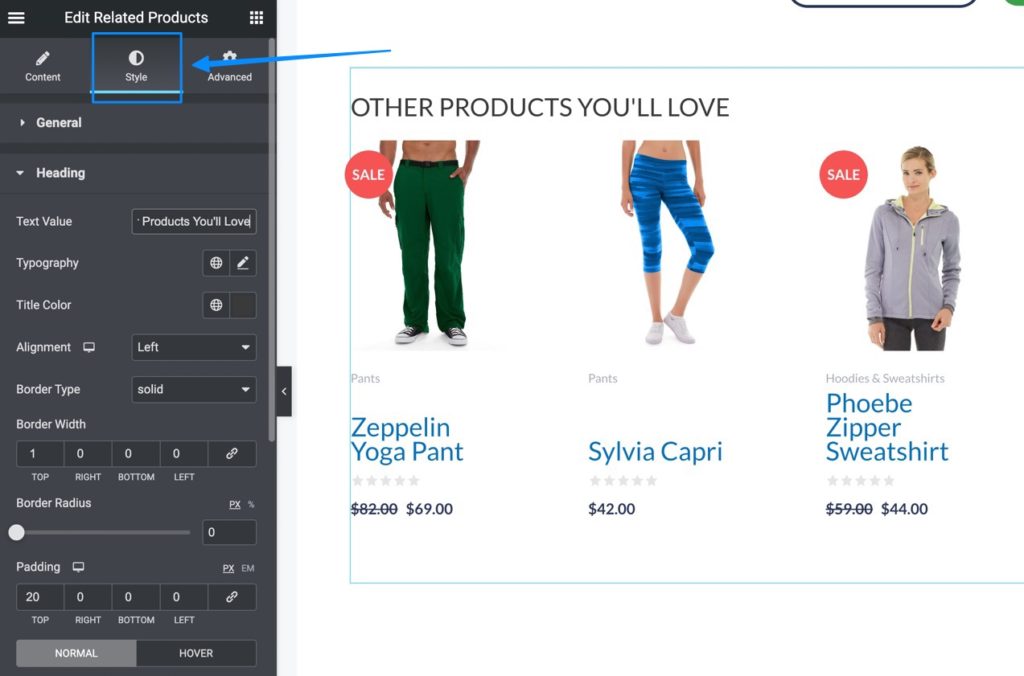
And, of course, the Related Products widget comes with a Style tab that’s packed with configurable settings. Change the border width in your heading; pick a different star color for ratings; and modify the vertical position of the sale badges. That’s just a small portion of what you can customize in the Related Products widget.
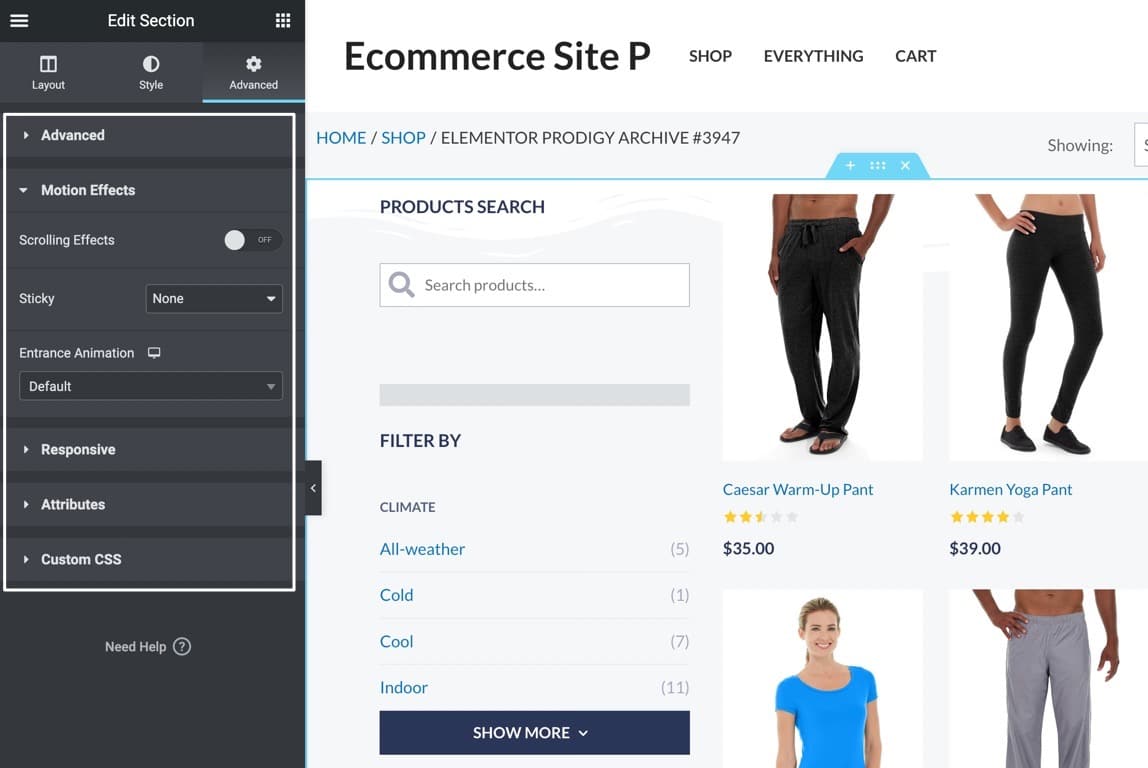
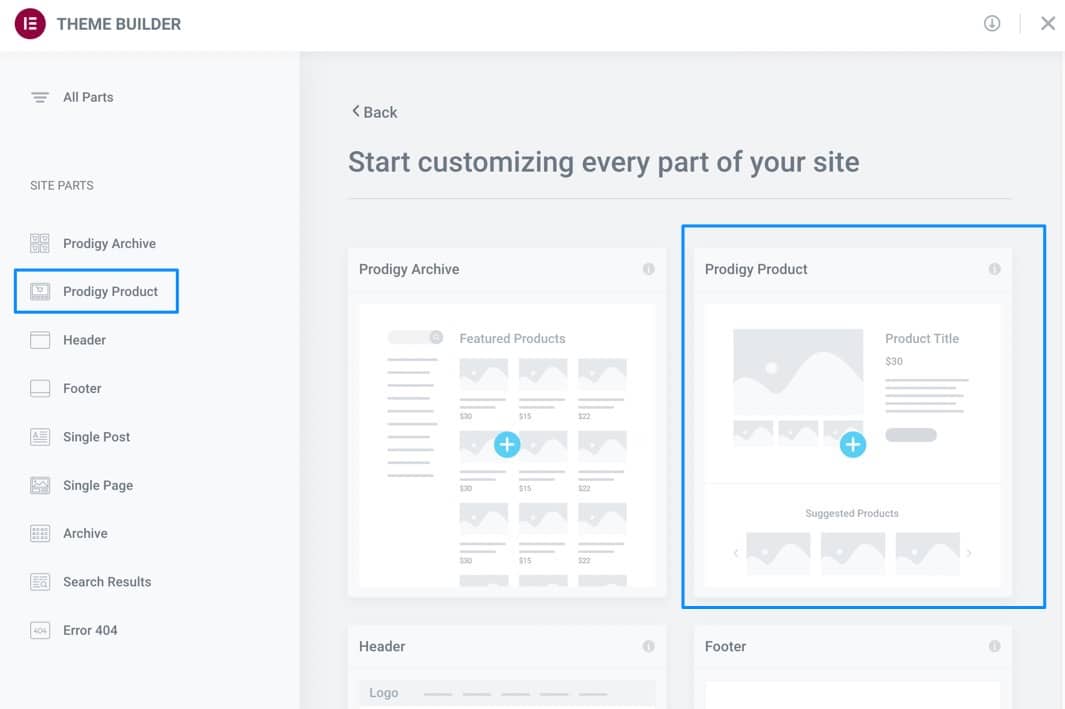
Product Archive Template
Styling a product archive with a standard WooCommerce theme is limited to whichever settings the developer decides to include in their theme. With Prodigy and Elementor, you gain full control over the customization of product archives, allowing you to generate a template for your main Shop page and reuse it over and over.
What’s nice about the Elementor templates from Prodigy are that they all work seamlessly with the Elementor Theme Builder.
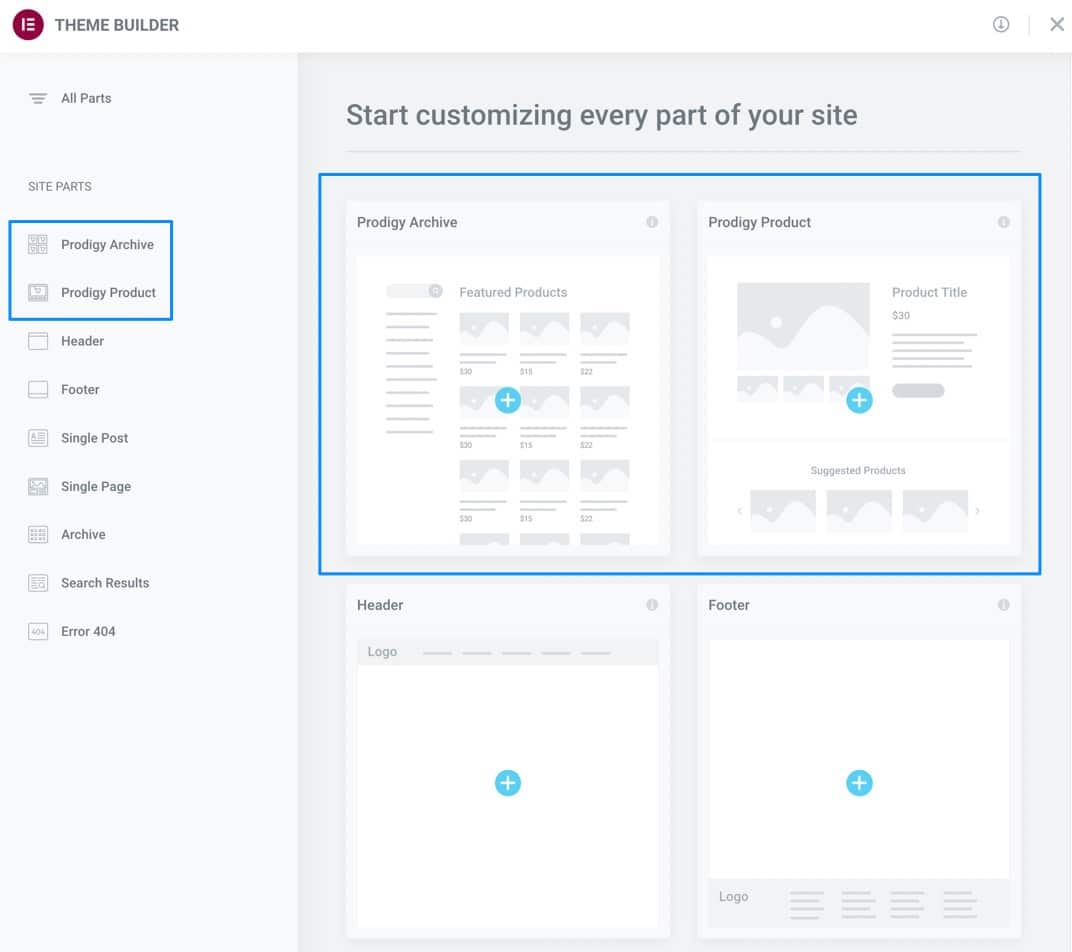
Within the Theme Builder, designers can build an entirely unique Product Archive to use as the main Shop page, with filters, search bars, product grids, and more.
Some of the many layout settings include:
- Vertical alignments
- Overflow control
- Section stretching
- Content width
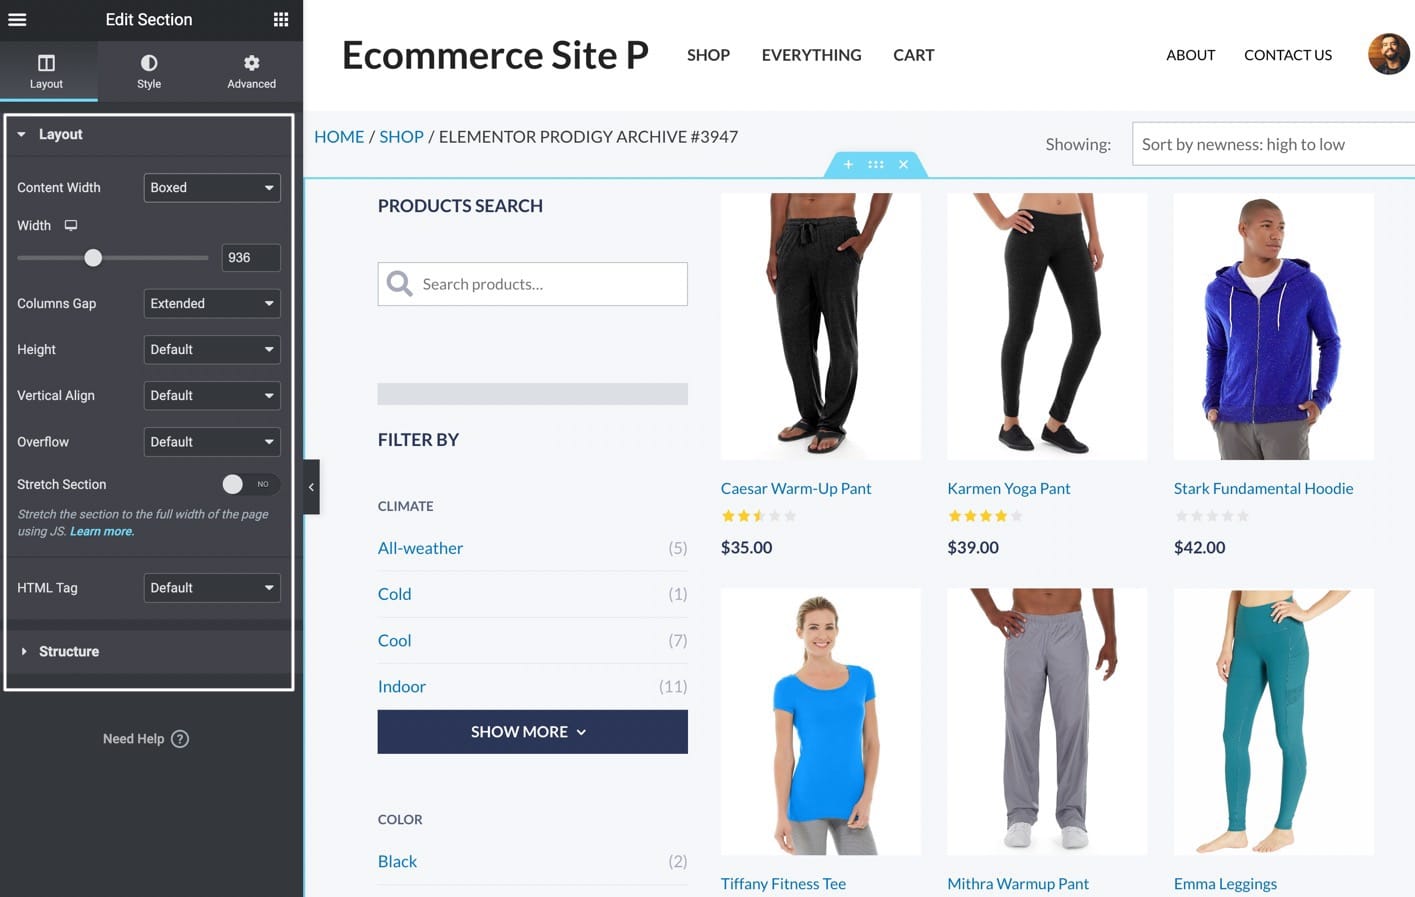
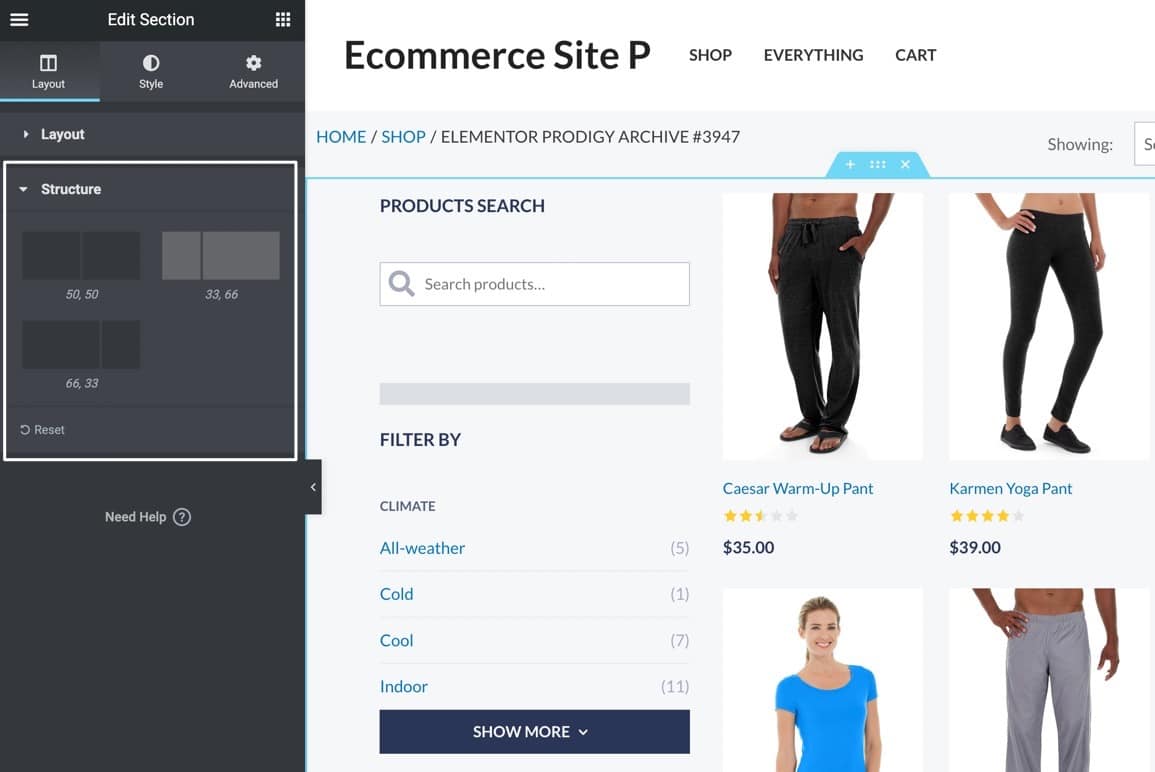
And there’s a Structure tab for modifying the percentage of space that each column takes up.
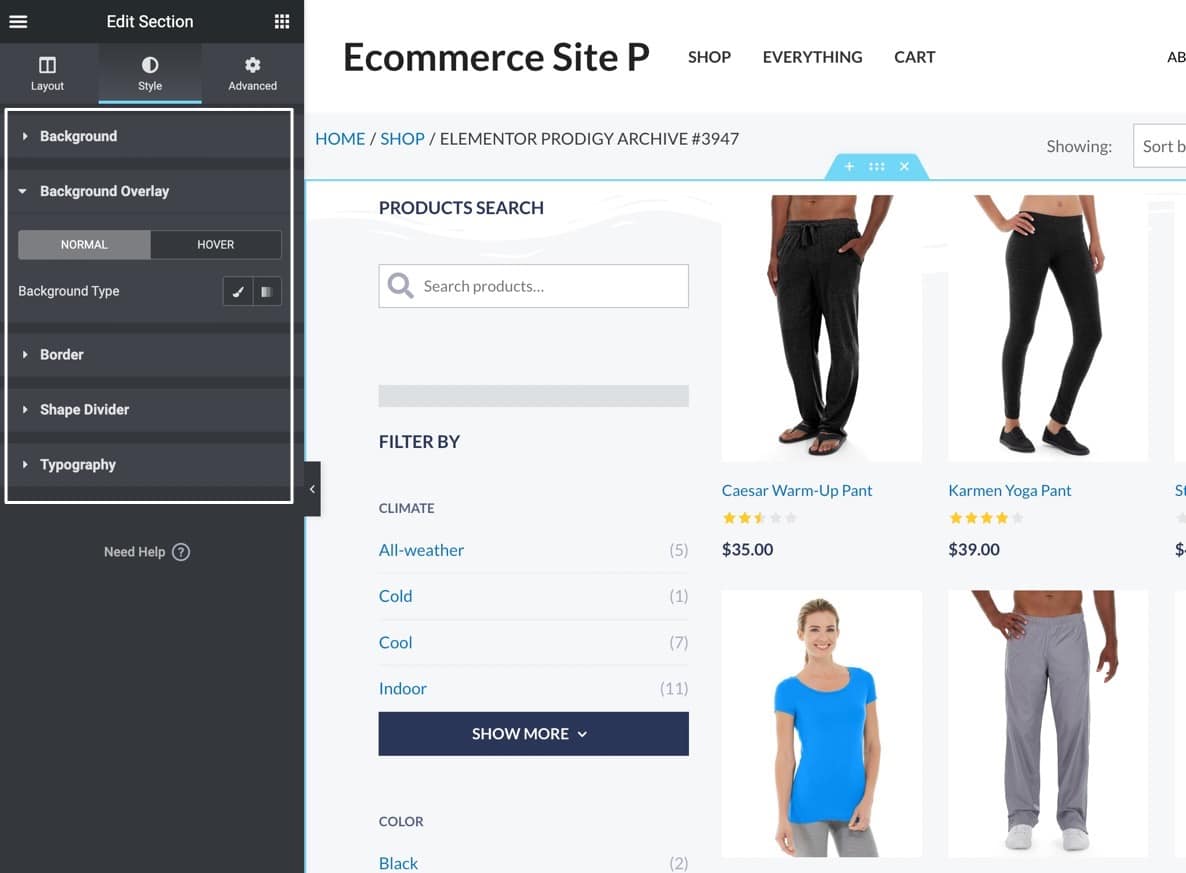
The Product Archive templates also have powerful Style tools for:
- Backgrounds
- Background overlays
- Borders
- Shape dividers
- Typography
And, of course, every widget and page template from the Prodigy Elementor integration has Advanced settings for everything from Motion Effects to Attributes, and Custom CSS to Responsiveness.
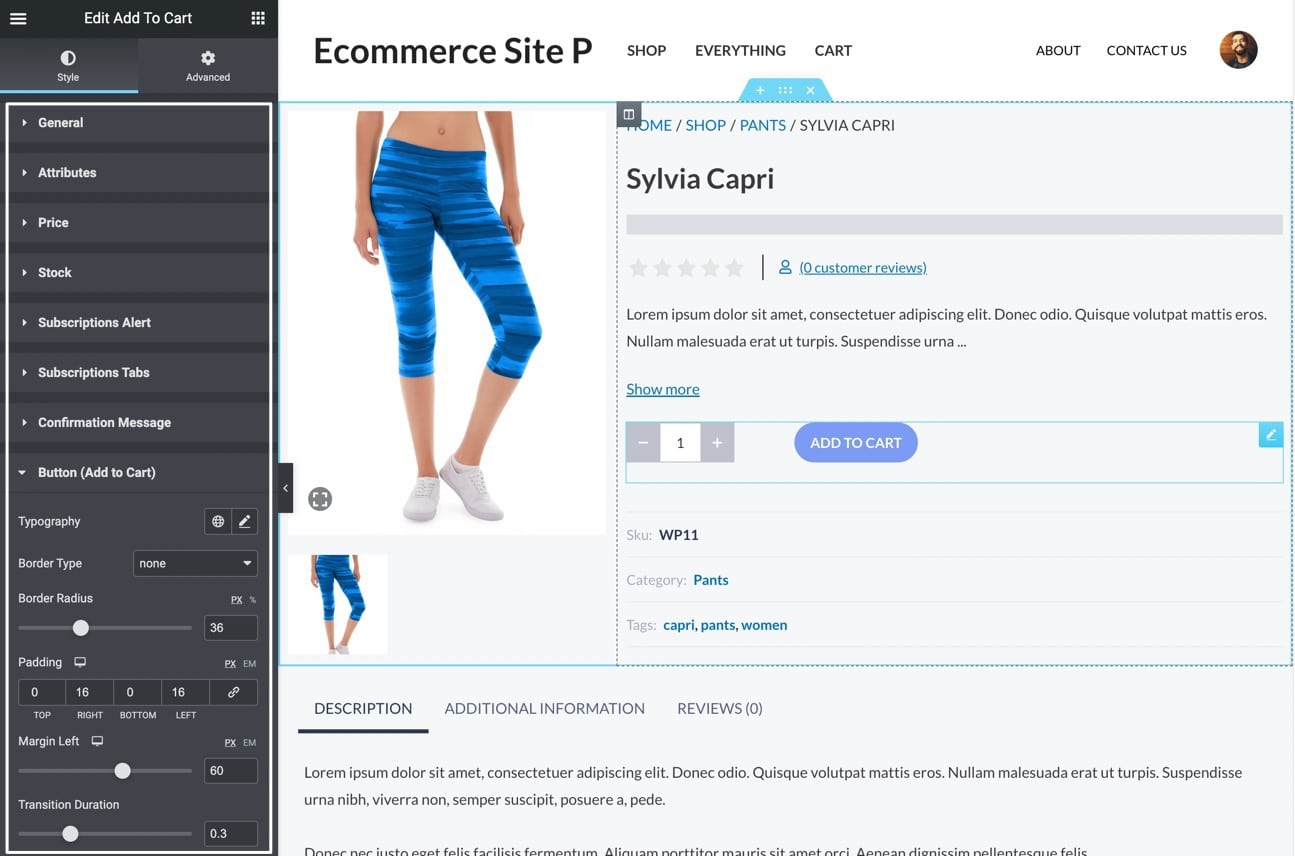
Single Product Template
Prodigy provides a second template with its Elementor integration, called the Single Product template. In short, this template grants you control over the entire style of each product page in your store, a feature that’s severely limited in many WooCommerce themes.

Customizable and saveable for later use, the Single Product template is also controlled within the Elementor Theme Builder.
The Single Product template provides the usual Layout, Style, and Advanced tabs for editing elements like:
- Backgrounds
- Borders
- Content width
- HTML tags
- Motion effects
- Custom CSS
- Shape dividers
- Typography
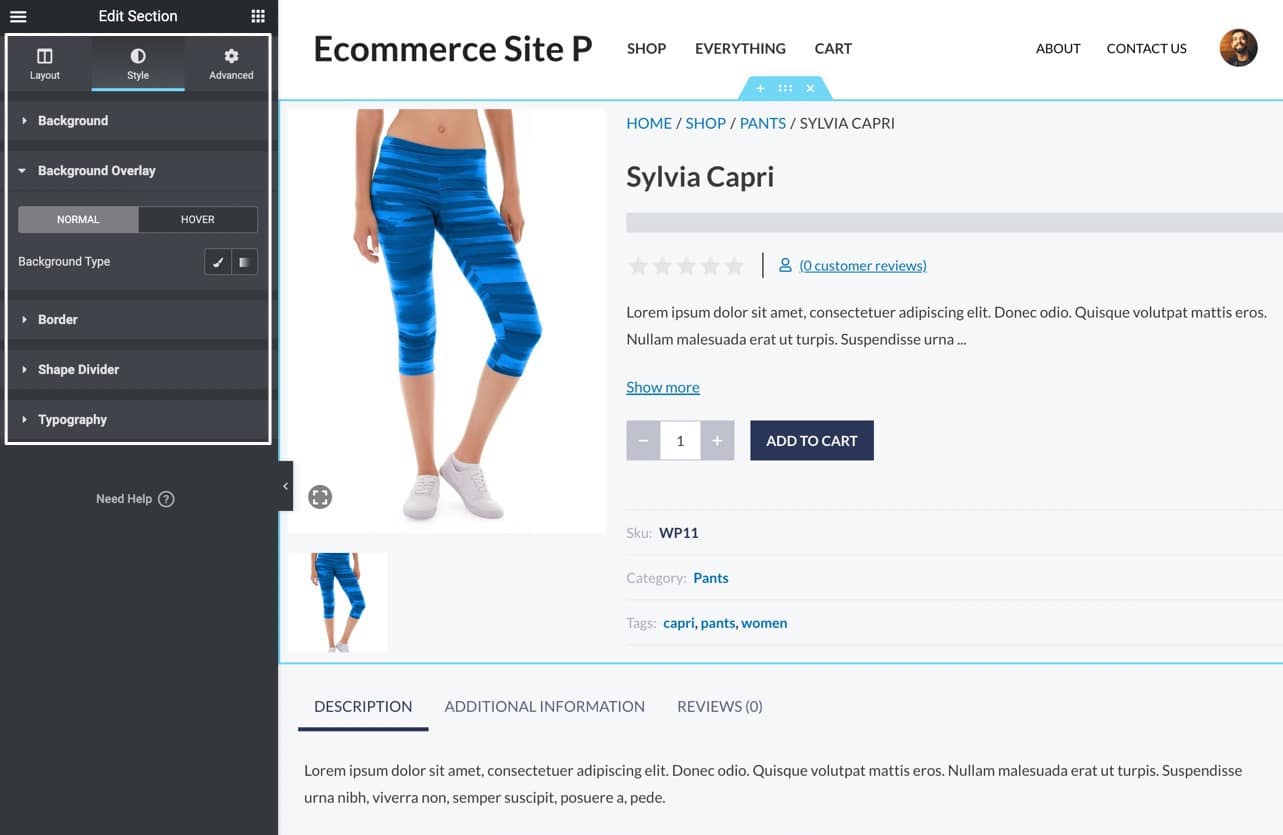
Yet, some of the true power that comes from these templates is your ability to click on any aspect of the template and customize each item.
For instance, you could click on the Add To Cart button to modify its Border Radius, Color, and Margin.
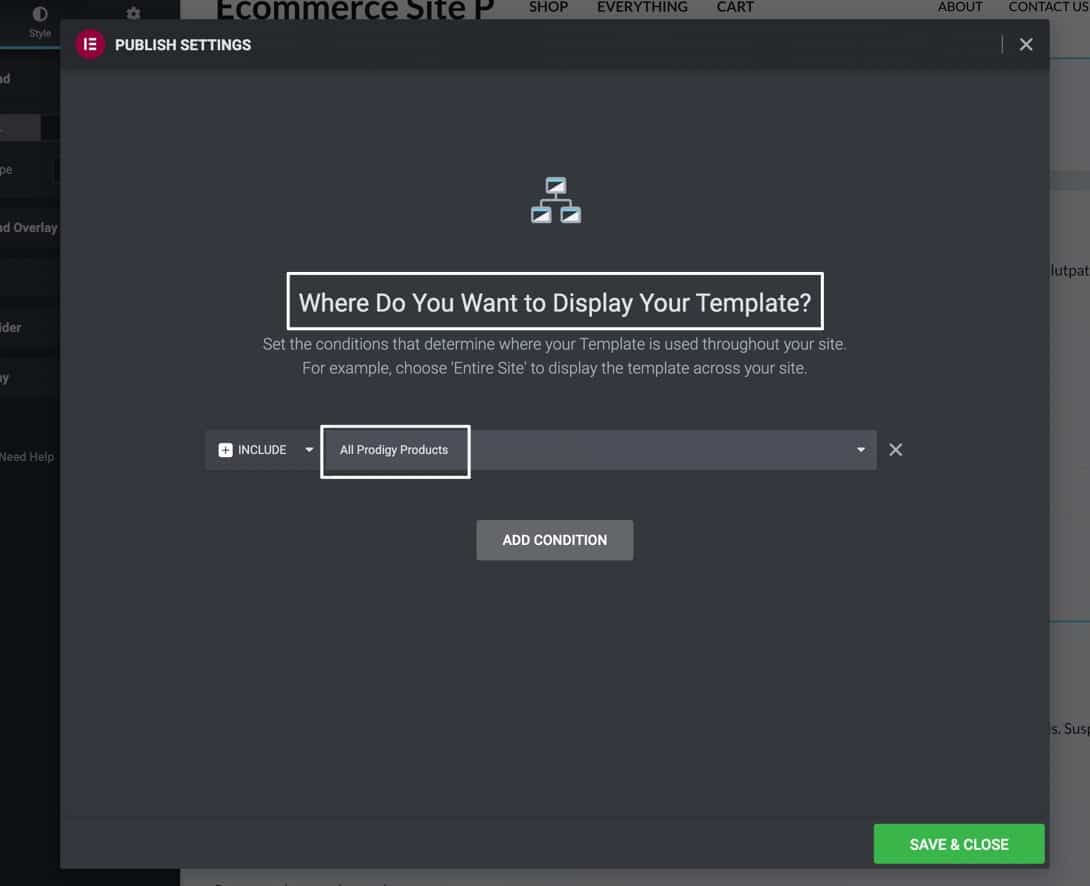
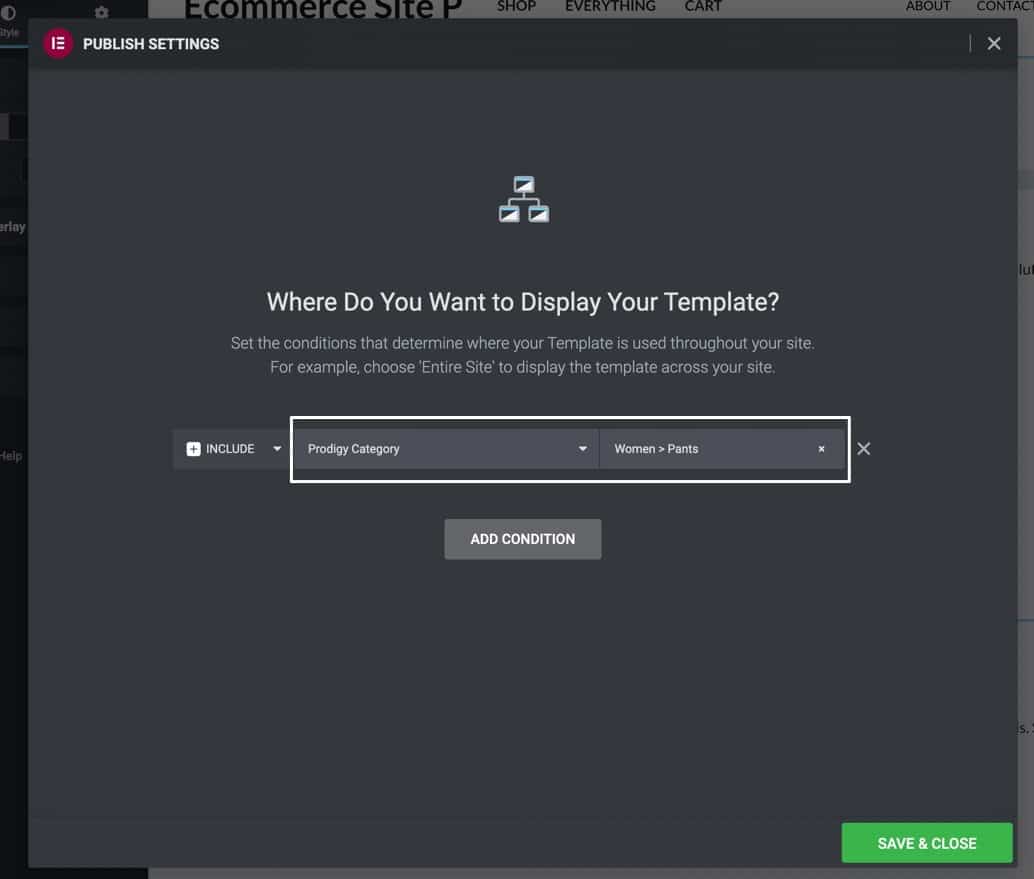
Conditional Displays for Templates
To make the page templates even more impressive, the Prodigy Elementor integration offers conditional displays, for only adding something—like a Single Product template—to a certain group of products.
After choosing to Publish a template, Elementor asks where you want to display the template. You then have the option to add the new design to All Prodigy Products.
Alternatively, you might select a condition, like a Prodigy Category, then pick one category to inherit the new product page design.
Start Building Stores for Your Clients with Prodigy’s Free Ecommerce Solution for WordPress
Prodigy’s Elementor integration with it’s WordPress Plugin is an exciting development for the WordPress Community and their store owner clients due to its simplicity and expanded feature set compared to WooCommerce. If you need more in-depth tutorials on how to use Prodigy’s Elementor integration, you can find all of the Elementor documentation here.
In the meantime, you can create a free account today on the Prodigy platform to experience a revolutionary, free eCommerce solution built specifically for WordPress developers, designers, and agencies. Feel free to contact the Prodigy team by phone, email, or start a chat if you have any questions.